n8n + ChatGPT: Build a Content Generation Automation in 20 Minutes
This tutorial walks you through connecting ChatGPT (GPT-4o) to n8n and building a workflow that turns a topic + keywords into a blog draft, meta description, and Slack notification — automatically, every time. No coding required.
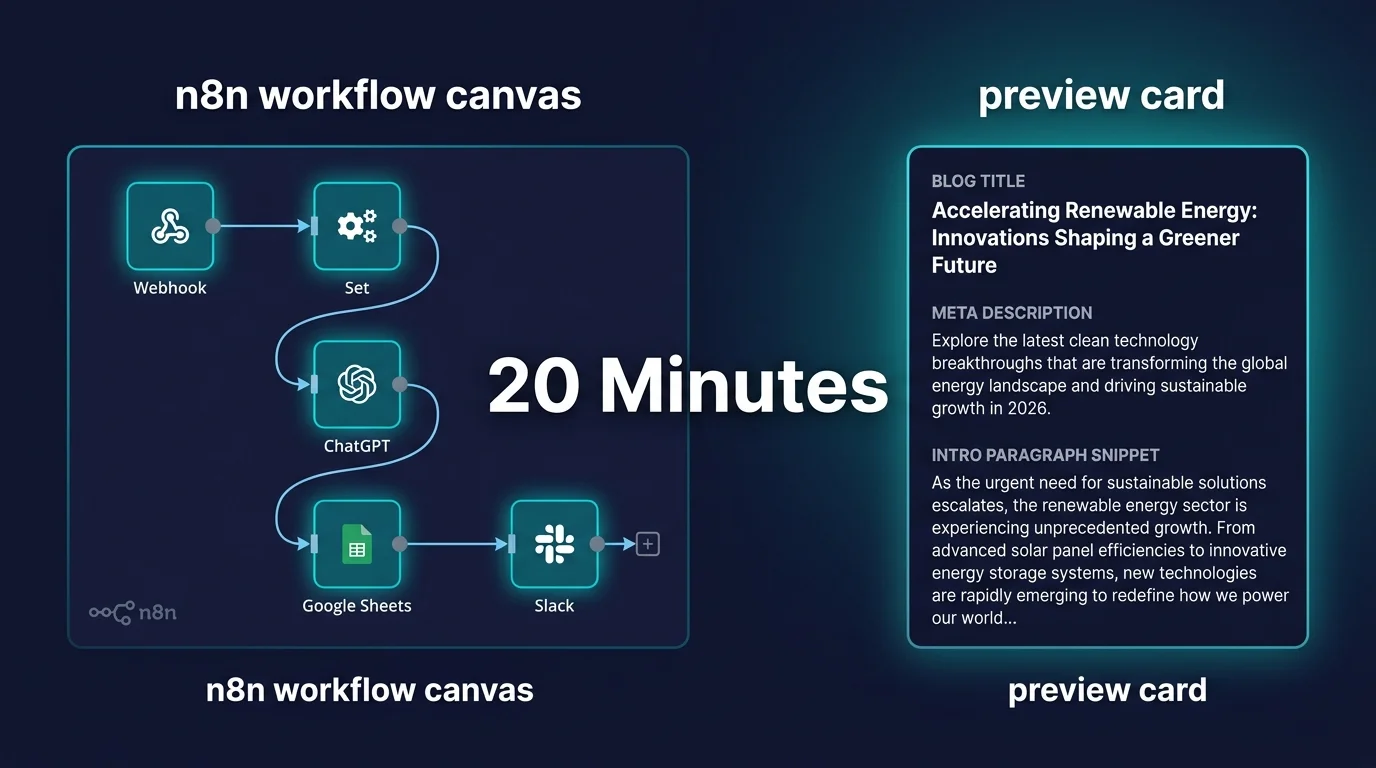
What you'll build
A webhook-triggered n8n workflow that accepts a content brief (topic, target audience, tone), sends it to GPT-4o, receives a 500-word blog intro + meta description, appends the result to a Google Sheets content calendar, and posts a Slack notification with the draft.
Time: 20 minutes from a blank n8n canvas to a working workflow. Cost: ~$0.001 per run (GPT-4o mini). Prerequisites: n8n account (cloud or self-hosted), OpenAI API key, Google account, Slack workspace.
Steps
- Set up your OpenAI credentials in n8n
- Create a new workflow and add a Webhook trigger
- Add a Set node to define the content brief
- Add the OpenAI node and write your prompt
- Parse the response with a Code node
- Append the draft to Google Sheets
- Send a Slack notification
- Test the workflow end to end
- Variations and next steps
Before adding any nodes, store your OpenAI API key in n8n's Credentials vault. This way, every OpenAI node in every workflow can reuse the same key — you never paste it directly into a node.
Get your API key: log into platform.openai.com → API keys → Create new secret key. Copy it immediately — it won't be shown again.
Add to n8n: in your n8n instance, go to Settings → Credentials → Add Credential. Search for "OpenAI", select it, paste your API key, and save. Name it something you'll recognise ("OpenAI – main").
Tip: Set a usage limit on your OpenAI account before you start ($5–10/month). While this workflow is extremely cheap, a misconfigured loop could trigger thousands of API calls. Platform.openai.com → Settings → Limits → Set monthly budget.
In n8n, go to Workflows → New. Click the "+" button on the canvas to add the first node. Search for "Webhook" and select it.
Webhook settings:
- HTTP Method: POST
- Path:
content-brief(or any slug you prefer) - Response Mode: Respond Immediately
- Response Data: First Entry JSON
Click Listen for Test Event — n8n will show a URL like https://your-n8n.com/webhook-test/content-brief. Keep this tab open.
Note: During testing, use the test webhook URL (shown while the workflow is in test mode). After you activate the workflow, switch to the production URL (without -test). They're different endpoints.
Add a Set node after the Webhook. This node extracts and names the fields from the incoming request body, making the data easier to reference in later nodes.
In the Set node, add these fields (each mapped from the webhook body):
topic:     {{ $json.body.topic }}
audience: {{ $json.body.audience }}
tone:     {{ $json.body.tone }}
keywords: {{ $json.body.keywords }}
This assumes the POST body will look like:
{
  "topic":    "Best automation tools for small business",
  "audience": "small business owners, non-technical",
  "tone":     "practical, conversational",
  "keywords": "n8n, Zapier, Make, automation 2026"
}
Keep All Input Data should be toggled off in the Set node — otherwise the raw webhook data will mix with your named fields and clutter later nodes.
Add an OpenAI node after Set. Connect it to your saved credential. Configure:
- Resource: Chat
- Operation: Complete
- Model: gpt-4o-mini (cheap and fast — upgrade to gpt-4o for higher quality)
- Max Tokens: 1200
- Temperature: 0.7
In the Messages section, add two messages:
Message 1 — System:
Role: system
You are a professional content writer specializing in B2B SaaS and
automation topics. You write in a clear, practical tone without
AI-giveaway phrases like "In conclusion", "Delve", or "It's worth
noting". Always return your response as valid JSON.
Message 2 — User:
Role: user
Write content for this brief:

Topic: {{ $json.topic }}
Target audience: {{ $json.audience }}
Tone: {{ $json.tone }}
Keywords to include: {{ $json.keywords }}

Return a JSON object with exactly these keys:
- "title": an H1 title (under 65 characters)
- "meta": a meta description (under 160 characters, includes main keyword)
- "intro": a 400-500 word blog introduction (first 2-3 paragraphs,
           no H1 heading, ends with a transition sentence)

Return ONLY the JSON object. No markdown fences, no extra text.
Why JSON output? Asking the model to return structured JSON lets you reliably extract each field in the next node — no fragile string parsing needed. GPT-4o and GPT-4o mini both follow this instruction consistently.
The OpenAI node returns the model's response as a string inside $json.message.content. Add a Code node (JavaScript) to parse it into a proper object.
// Code node — Run Once for All Items
const raw = $input.first().json.message.content;
const parsed = JSON.parse(raw);

return [{
  json: {
    title:    parsed.title,
    meta:     parsed.meta,
    intro:    parsed.intro,
    topic:    $input.first().json.topic    // pass through for Sheets
  }
}];
JSON parse errors: If the model occasionally wraps its response in markdown code fences (` ```json ... ``` `), add a strip step before parsing: raw.replace(/```json|```/g, '').trim()
Add a Google Sheets node. Authenticate with your Google account. Set:
- Operation: Append or Update Row
- Spreadsheet: select or create your content calendar sheet
- Sheet: Sheet1 (or rename to "Drafts")
Map the columns. Your sheet should have headers in row 1:
| Column header | n8n mapping |
|---|---|
| Date | {{ $now.toISO() }} |
| Topic | {{ $json.topic }} |
| Title | {{ $json.title }} |
| Meta Description | {{ $json.meta }} |
| Intro Draft | {{ $json.intro }} |
Tip: Add a Status column with a default value of "Draft". This way you can filter your sheet by status (Draft → Reviewed → Published) and track which pieces are ready to publish.
Add a Slack node after Google Sheets. Authenticate with your Slack workspace and set:
- Operation: Post Message
- Channel: #content or your preferred channel
Message text:
📝 *New content draft ready*

*Title:* {{ $json.title }}
*Topic:* {{ $json.topic }}
*Meta:* {{ $json.meta }}

_Intro draft saved to Google Sheets ↗_
No Slack? Replace this node with a Gmail node ("Send Email") or a Microsoft Teams node — the setup is identical, just swap the destination.
With the Webhook node in Listen for Test Event mode, send a test POST request. From your terminal:
curl -X POST https://your-n8n.com/webhook-test/content-brief \
  -H "Content-Type: application/json" \
  -d '{
    "topic":    "Best automation tools for small business 2026",
    "audience": "small business owners, non-technical",
    "tone":     "practical, conversational",
    "keywords": "n8n, Zapier, Make, automation"
  }'
Watch the n8n canvas — each node should highlight green as it executes. Check:
- OpenAI node output contains valid JSON with
title,meta,intro - Google Sheets has a new row appended
- Slack channel received the notification message
Once it works in test mode, click Activate in the top right. The workflow will now respond to POST requests on the production URL continuously.
Want to Go Further With n8n + AI?
LearnForge's AI Apps course shows you how to build production-grade AI automations in n8n — from content workflows to full AI agents that take actions autonomously. Module 0 is completely free.
Start Free Module →Variations and next steps
Schedule trigger instead of webhook
Replace the Webhook node with a Schedule trigger. Connect a Google Sheets node before the OpenAI node to read a list of topics from column A. Use Split In Batches to process one topic at a time. Each Monday morning, the workflow automatically drafts the week's content from your planned topics sheet.
Generate social captions in the same run
After the first OpenAI node, add a second one. Prompt: "Based on this blog title and intro, write a LinkedIn post (150 words), a Twitter/X thread (5 tweets), and an Instagram caption. Return as JSON: linkedin, twitter_thread (array), instagram." Pass $json.title and $json.intro as context.
Add human approval before saving
After the OpenAI node, add a Wait node (set to "Wait for Webhook"). Your Slack message includes an "Approve" link that hits a second webhook. Only when someone clicks Approve does the workflow continue to the Sheets + publish steps. This turns ChatGPT into a draft assistant rather than an autonomous publisher.
Upgrade to the AI Agent node
Replace the static OpenAI prompt with n8n's AI Agent node. Give it tools: an HTTP Request tool (Google Search via SerpAPI), a web scrape tool (read top 3 competitor articles), and the content generation prompt. The agent will research the topic, analyse what's ranking, and write a more competitive draft — all automatically.
FAQ
Write a blog intro about {{ $json.topic }} for {{ $json.audience }}. The values come from any previous node (webhook, Google Sheets row, form). This lets you run the same prompt against hundreds of different inputs automatically.Related Articles
n8n + Claude: Build an AI Agent That Reads and Responds to Emails
Same approach, different model — build a full email agent with Claude 3.5.
AI Automation Tools 2026: n8n vs Zapier vs Make vs LangChain
Which platform to use for which use case — full comparison with pricing.
What is an AI Agent? Plain English Guide for Non-Coders
Understand the difference between a ChatGPT call and a real AI agent.
Learn n8n from Zero — Free Module Available
LearnForge's AI Apps course takes you from zero to building real AI agents and content automations in n8n. No coding background needed. Module 0 is free.
Start Free Module →